This guide will cover:
- Setting up Your HarmonySite to Sell Tickets to Events
- The Booking Process
- Viewing Tickets that have been Booked
- Limiting the TOTAL maximum number of tickets sold
- Limiting the maximum number of tickets sold PER TICKET PRICE
- Limiting the minimum AND/OR maximum number of tickets sold PER BOOKING
1. Setting up Your HarmonySite to Sell Tickets to Events
For all the set-up instructions below, ensure that you are logged into your HarmonySite with a "Webmaster" level of access.
1.1. Enable the Ticketing module and set up payment options
Before tickets to events can be sold from your website, the Ticketing module must be enabled. You must also select at least one payment method. If you are already using the Membership Invoicing module or the Merchandise module in your HarmonySite, then you will most likely have already set up payment methods, and should not need to change them.
The payment methods available are:
- Credit card via a secure payment gateway. When a vistor uses this option to pay for their order, they remain on your website for the entire process (unlike PayPal, below). HarmonySite currently has integrated support for two payment gateways: Stripe and eWay. Please refer to our Payment Gateways page for more information.
- Credit card via PayPal. Note that your group must have a PayPal account in order to enable this payment method. These are free to set up, but note that PayPal takes fees on every transaction.
- Internet Bank Transfer. Your bank account details are displayed to visitors when they check out. They make a manual transfer via their own Internet banking system, and when your merchandise manager sees the payment in your group's bank account, they then manually mark the order as paid, and the goods can be shipped.
- Cheque/Money Order. Your postal address is displayed to members when they received their invoice. They post a cheque, and when your merchandise manager receives it, they then manually mark the order as paid, and the goods can be shipped.
To enable the order module and set up payment options...
- Click the "cog" icon in the top-right corner of the site
- On the Website Setup and Configuration page, click the cog icon next to "HarmonySite"
- Click the Configuration tab
- Tick the box at the top of the tab called Online Invoices/Orders/Tickets/Donations
- Tick the box at the top of the tab called Event Tickets
- Click the Payments tab
- If you haven't already done so, enter the details of at least one payment method. For example, the bank account instructions may look something like this...
Please pay funds into the following account:
Bank: First Bank of Harmony
BSB: 123456
Account name: My Excellent Group Inc.
Account number: 12345678
...while the cheque/money order instructions may look like this...
Please make cheques payable to My Excellent Group Inc.
and post to:
My Excellent Group Inc.
PO BOX 9876
Mytown SA 1234 - If you wish to allow visitors to pay for merchandise securely using a credit card, please refer to our Payment Gateways page for more information. If you wish to use the "Stripe" payment gateway (recommended), then there is a page in your HarmonySite to set this up quickly and easily. Visit your main Members page, then look for the link called Connect to Stripe Payment Gateway, and follow the instructions there.
1.2. Assign administration privileges
There are new HarmonySite database areas that are involved in selling tickets. Whichever of your members will be responsible for setting up and selling tickets need to have administration privileges over these areas. As ususal, all administration privileges are maintained in the Logins database.
For each member that will be responsible for setting up tickets for events, please do the following...
Click on the Admin link in the top-right corner to display the Administration Dashboard
Scroll down to the Members heading, and click on Logins in the far-right Database tables column
- Locate the login for the member in question, and click the update icon
- Ensure that the Access Level for the login is set to Data Administration Access
- The following database areas should be ticked:
- Event ticket pricing
- Event ticket types
- Events
- Lists
- Order/invoice/booking items
- Orders/Invoices/Bookings
- Click Save at the bottom
1.3. Set up ticket types and pricing levels
Pricing Levels
You will most likely wish to sell your event tickets with a variety of pricing levels. Your HarmonySite should already have the following pricing levels set up:
- Full price
- Concession
- Senior
- Complimentary
Naturally, not all of them will be used for all events. When it comes time to set up an event for selling tickets, you can select which of these will be used for that event.
Note that these pricing levels do not include the actual price! The prices vary from event to event, and are defined when you set up the event itself.
You are welcome to create new pricing levels at any time. Any pricing level you create will be available to be used all future events. You can create (or modify or delete) pricing levels now, or you can wait until you are setting up ticketing for an event. It's actually easier to wait until you are setting up an event, but if you want to do it now, the steps are:
- Click on the Admin link in the top-right corner to display the Administration Dashboard
- Scroll down to the Website Config/Info heading, and click on Lists in the far-right Database tables column
- From the All Lists categories box, click on Ticket price levels
- On the Lists Administration Page, you can either:
- Create a new pricing level. Simply click the Add new list item button in the top-right corner, and fill in the blanks
- Edit or delete existing pricing levels. In the large list of options, locate each of the price levels above, and click either the "update" or "delete" icons
Ticket Types
At any given event, you may have a variety of different seating options or seating areas. Your HarmonySite comes with the following predefined types:
- Main auditorium
- Premium seating
Naturally you are welcome to change these ones, or delete them, or create new ones. There must always be at least one. As with pricing levels, not all of ticket types will be used for all events. When it comes time to set up an event for selling tickets, you can select which ticket types will be available for that event.
As with pricing levels (above), you are welcome to create new ticket types at any time. Any ticket type you create will be available to be used all future events. You can create (or modify or delete) ticket types now, or you can wait until you are setting up ticketing for an event. It's actually easier to wait until you are setting up an event, but if you want to do it now, the steps are:
- Click on the Admin link in the top-right corner to display the Administration Dashboard
- Scroll down to the Events heading, and click on the Event ticket types link in the far-right Database tables column
- Edit or delete the existing ticket types in the usual way, or add new ones
- You can also reorder these (which affects the way they are presented to potential purchasers), by clicking the Reorder ticket types button
1.4. Set up an event so that tickets can be sold
Note: If your HarmonySite uses "productions" (see our guide to setting up productions), and you wish to sell tickets to each of the performances in your production, then each event must be set up to sell tickets individually.
1.4.1 Adjust the Event
To enable tickets to be sold for an event, you must nominate which member will be responsible for handling online ticket sales. This member will receive notification emails whenever an event is sold. It's a simple process to set this...
Note: If the event is part of a production, then perform these steps on the production, not the event.
- Open the page where you view the details of the event (production)
- Click the Update link at the top of the page
- Click the Public tab
- In the field called Send ticket purchase notifications to, select the relevant member
- While you're here, ensure that the field just above that called Bookings webpage is empty - otherwise this (external) webpage will be used to sell tickets to this event, instead of the built-in HarmonySite ticketing system that we're currently configuring
- Click Save at the bottom
1.4.2 Set up Ticket Pricing
The event is now ready to have ticket pricing set up. To do so...
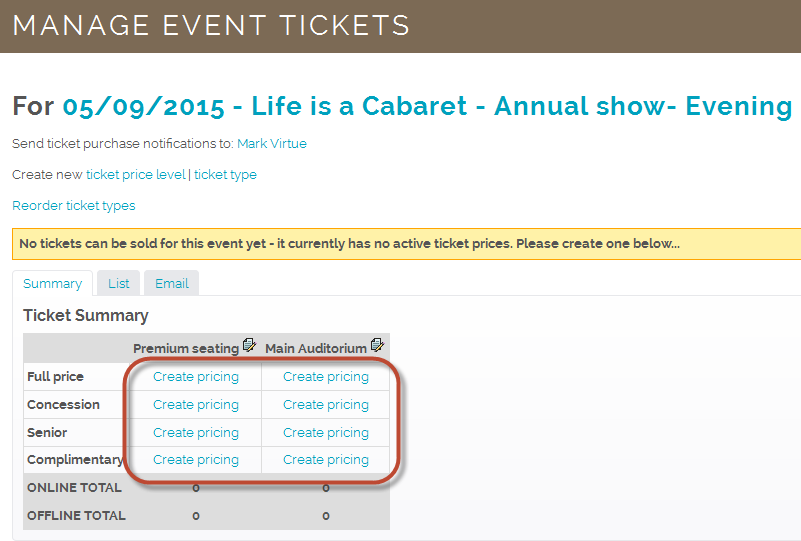
- Click the Manage Tickets link at the top of the event's page

- You are taken to the event's Manage Event Tickets page. You need to create at least one ticket price. Choose a ticket type/pricing level combination (e.g. Full price/Main auditorium), and click the Create pricing link that corresponds to that combination (i.e. one of the following links):
- Enter a price (or leave as $0.00 for complimentary tickets)
- If you want, you can specify questions to be asked during checkout, such as "How did you hear about this event?" or "Any special dietary requirements?".
The questions you select here are specific to this ticket type/pricing level combination.
To do this, look under the heading "Checkout Questions". You'll see something like this: Questions in yellow on the left will be asked during checkout (in the order given).
The questions on the right, in blue, are the other questions you can choose from.
Drag questions from right to left to select them, and drag them up and down to re-order them.
You can choose as many questions as you want.
(For more information, see our guide to Checkout Questions.) - Click the Save button at the bottom.
- Repeat steps 2 - 5 for each ticket type/pricing level combination you wish to sell tickets for. Note that it is NOT necessary to create pricing for every combination - only those combinations that you plan to selll (or give away) tickets for.
Once you have created the first of these ticket pricings, your event is ready for selling tickets! You may now return to the event's page, where you'll see a big red Book Now button. You can click that button to see what your site visitors will see when they wish to purchase tickets to your event.
2. The Booking Process
The booking process, for your site visitors, is simple and unsurprising...
- They visit your event's page
- They click the big red Book Now button
- They are taken to a page where they can select from the various ticket type/pricing level combinations. They can book tickets from more than one combination. Up to 50 tickets can be booked per combination
- They check out via a shopping cart. They must enter their full contact details to check out
- They can pay via any of the payment methods you set up.
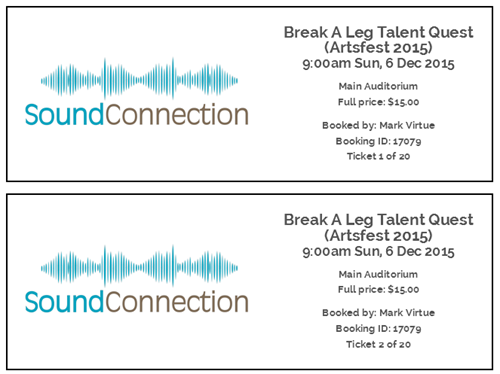
- At the completion of the booking process, they are sent an email containing the full details of their booking. If they chose one of the payment methods that supports instant payment (i.e. credit card or PayPal), then their email will contain a link to a page on your website where they can print their tickets. Printed tickets look like this...
- The member nominated to receive booking notification emails will also receive an email when the booking is completed
- If the booker chose a payment method that does NOT involve instant payment (i.e. Internet bank transfer or cheque), then someone must keep an eye on the bank account or the letterbox. If a payment is eventually received, someone MUST return to that booking and mark it as "Fully paid" AND send out an updated booking status/confirmation. If this does not happen, then the person will have no means to print out their tickets! See below for how to change the status of a booking and send a booking status update.
3. Viewing Tickets that have been Booked
After tickets have been sold, you can return to the Manage Tickets page for an event (see above) to do any of the following...
- View a summary of all sold tickets, broken down by ticket type and pricing level
- View a full list of all individual bookings
- Send an bulk email to all ticket purchasers
- Adjust the quantity of tickets sold offline (sold without using the HarmonySite ticket system)
Notice the three different tabs on this page:

Note also that it's possible to print this page. Look for the Printable version link at the bottom of the page.
Receiving Payments
When a payment for an online booking is received via Internet bank transfer, cheque or cash, it is important to mark the booking as paid and send a new booking confirmation, so that the booker has a mechanism for printing their tickets. This is done as follows...
- Visit the event's main page
- Click the Manage Tickets link at the top of the page
- Click the List tab
- Locate the booking in the list, either by booker name, booking ID, date or amount
- Click the booking ID for that booking
- On the booking page, click the Update button
- Change the Status to Fully Paid
- Scroll to the bottom and tick the box called Resend email containing details of this...
- Click the Save button
4. Limiting the TOTAL maximum number of tickets sold
The TOTAL number of tickets that can be sold is controlled by the "seating capacity" of the venue.
To update a venue to add its "seating capacity", or to create a new venue, you can do the following...
- Go to the event's main page.
- Click the Update button at the top to edit the event:

- Scroll down to the Venue section.
- Click the link here to go to the "Venues Administration" page:

- Click Add new venue to create a new venue from scratch, or click one of the "edit" buttons on the right-hand side to update an existing venue.
- Fill in the venue's name, address, and any other details you want.
- Scroll down to the Physical Specification section, and enter the maximum number in "Seating Capacity":

- Scroll down to the bottom and click Save.
Now, you can select this venue in the event's settings:
- Go to the event's main page.
- Click the Update button at the top to edit the event:
- Scroll down to the Venue section.
- Click on the dropdown here and select the venue you were editing before:

- Scroll down to the bottom and click Save.
Now, the system will automatically limit the number of tickets that can be sold for this event, based on the "seating capacity" you specified.
5. Limiting the maximum number of tickets sold PER TICKET PRICE
You can also limit the number of tickets available for each ticket price:
- Go to the event's main page.
- Click Manage tickets:

- Click the "edit" button next to one of the ticket prices:

- Set the "Maximum number of tickets available of this type":

- Scroll down to the bottom and click "Save".
Then, you'll see the number of available tickets here.
For example, if there's only one ticket left (for this ticket price), it'll look like this:
And when all the tickets (of this ticket price) have been sold, it'll turn red:
When someone tries to buy a ticket, they'll see something like this:
6. Limiting the minimum AND/OR maximum number of tickets sold PER BOOKING
You can require people to book at least a certain number of tickets in one go.
For example, you can use this to make a discounted price available for group/bulk ticket purchases.
You can also allow people to book at most a certain number of tickets in one booking.
This is useful if the tickets are a registration for an event, and each person should only be able to book one place for themselves.
This is controlled in the settings for each ticket price. To set this up:
- Go to the event's main page.
- Click Manage tickets:

- Click the "edit" button next to one of the ticket prices:

- Set the "Minimum quantity allowed in one booking". By default, this is 1:

- Set the "Maximum quantity allowed in one booking". By default, this is "Not specified":

- Scroll down to the bottom and click "Save".
Now, when someone buys a ticket, the quantity of tickets they can buy will be restricted as necessary.
For example, if you set the "Maximum quantity allowed in one booking" to 1, then they will only be able to select "1" ticket of this price:

Was this article helpful?
That’s Great!
Thank you for your feedback
Sorry! We couldn't be helpful
Thank you for your feedback
Feedback sent
We appreciate your effort and will try to fix the article